How to install Eclipse on Windows
Contents
If you’re a beginner programmer — or just a curious computer person — sooner or later you’ll come across development environments (Integrated Development Environment or IDE), that is, software used to develop other software. Yes, a program for making programs.
Now, if you need to program in C or C++ and you want to do it quickly without complicating your life, Dev-C++ is what you’re looking for. The original Bloodshed Dev-C++ is no longer maintained: today you can download Embarcadero’s version for free, which is its continuation. All you have to do is install it, and everything will work perfectly.
Instead, if you’re a masochist, or you have nothing better to do, or maybe your professor is forcing you to use it, let’s see how to install and configure Eclipse on Windows.
Installing Java
1. First of all you need to install the latest version of Java. Go to the official download page, then download the Windows Offline and Windows Offline (64 bit) packages and install them.
NOTE: On 32-bit operating systems, downloading and installing only the Windows Offline file (i.e. the non-64-bit version) is enough.
Installing and configuring MinGW
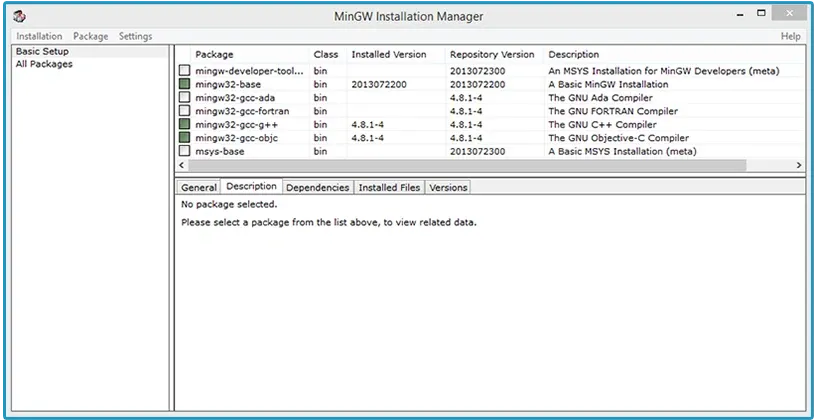
2. Now we’ll set up the “core” of the development environment we’re going to use. Download and install the latest version of MinGW at this link. Once the MinGW Installation Manger is open, go to Basic Setup. Then right-click the mingw32-base entry and choose Mark for installation. Do the same for mingw32-gcc-c++ and mingw32-gcc-objc. Finally, go to the Installation menu and select Apply Changes.
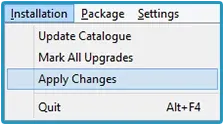
If everything went well, once the package installation is finished we should see a screen like this one:
Adding MinGW to the environment variables
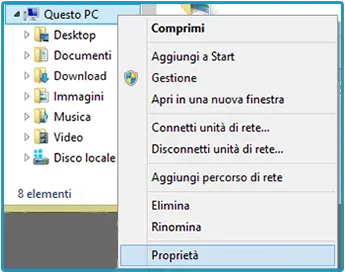
3. Now you need to add the MinGW installation path to the system environment variables. Even if it sounds hard, it really isn’t. Right-click on Start -> Computer (on Windows 7), or on Start -> My Computer (on Windows XP), or on Computer or This PC in the left sidebar of any folder window (on Windows 8 and later), and click Properties.
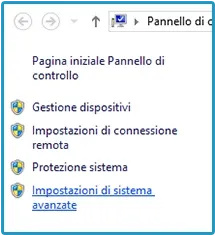
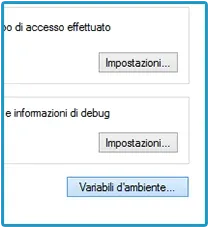
Then, on the left, choose Advanced system settings and click the Environment Variables button.
In the System variables section, scroll down until you find the Path entry. Select it, then click Edit.
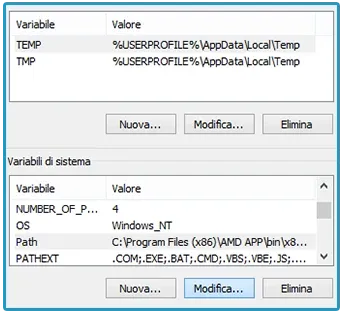
Being careful not to change any of the existing entries, scroll all the way to the end of the line (to the right) and add:
;C:\MinGW\binIt’s important that you copy the semicolon too, so this entry is separated from the one before it. Each path must be “isolated”, i.e. preceded and followed by a semicolon.
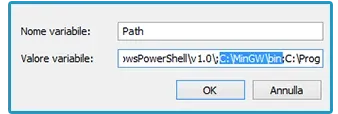
Confirm the changes by clicking Ok on all the windows that are still open.
Downloading Eclipse and choosing a workspace
4. We’re almost done: the easiest part is left! Download Eclipse from the official website. This guide is about C/C++ programming, so you need to download Eclipse IDE for C/C++ Developers. Depending on your system, pick the 32- or 64-bit version. Wait for the download to finish and… We’re there! Once extracted from the compressed folder, Eclipse works perfectly and is ready to use. Choose the workspace (i.e. the folder where your projects will be saved), and happy coding!

Frequently asked questions
Do I still need to install Java separately?
Almost never. Recent Eclipse distributions include their own Java runtime, so the first step of the guide can often be skipped today: it was needed back in the Eclipse Luna days, when the IDE relied on the Java installed on the system.
Why do I need MinGW if I already installed Eclipse?
Because Eclipse is just the environment: the editor, the project, the debugger. The one that turns C or C++ code into a runnable program is the compiler, which on Windows you get with MinGW. Without a compiler Eclipse lets you write code it can't build, and that's the number one cause of the «binary not found» message.
Is there an easier way to start programming in C?
Yes, and I recommend it to anyone just starting out: Dev-C++ or Visual Studio Code with MinGW get you writing code in minutes, without the configuration Eclipse requires. Eclipse makes sense when it's your course or your job asking for it.